Walkthrough Siberia 3 full description 15
In 2002, one of the most beautiful and atmospheric quests of the current millennium was released - Syberia, which was able to instantly gather an army of fans around itself. Just 2 years later, the second part was released, which surpassed the original in almost all respects. The happiness of the fans knew no bounds, but along with joy came also grief, because Benoit Sokal, the creator of the series, then announced that he was not going to make a continuation, since the story of Kate Walker was completely completed. But, as it turned out, the famous game designer still had something to talk about.
13 years later, the long-awaited third part was released, which improved significantly graphically and moved to modern consoles. In addition, its basis has remained the same, that is, before us is still the same exciting quest, in which, at times, we have to seriously use our brains. We decided to help you in this difficult task by publishing a complete walkthrough of Syberia 3 with all existing solutions.
Background
The plot of the sequel starts almost at the same moment where the previous part ended - Kate managed to fulfill Hans Voralberg's main dream, allowing him to go into the unknown riding a mammoth. The players were then only shown how Walker waves goodbye to his friend and cries with a sad smile on his face, that is, the further fate of the girl was unknown to us. Now you can find out what happened to the lawyer after these events.
Kate washes up on the shore of Mother Russia, where she is immediately found by yukols and saved from death. A couple of days later, our heroine finally wakes up and finds out that she is in the hospital. Not far from her, on another bed, lies a legless young man, who is the leader of the Yukols. He lost his leg in an artillery attack carried out by the military to intimidate the locals. Walker finally comes to his senses and decides to get out of the hospital at all costs. This is where the new adventure of the tireless dreamer begins.
First chapter
Leave the room
As soon as you wake up, talk to Kurk from the Yukol tribe (press the keys according to the prompts on the screen). Go to the door (located to the left of Raven). Hover your mouse pointer over the door handle to make a gear icon appear—it means you can perform a contextual action. Click LMB to have Kate open the door, but it will be locked.
Check the button on the wall (to the right of the door). Click on it (another symbol will appear) - it will not work. Move the cursor to the right to see how to repair the device in the manual. You will be able to look inside the mechanism.
Go to the table located in the center of the room and hover your mouse over the plate of soup - click on LMB when the zoom option appears (magnifying glass icon). Take the knife lying next to the plate (hand symbol).

Return to the box with the button and while zooming, press the “I” key to open the inventory - it will appear on the left side of the screen. Using the down arrow key, change the position of the knife so that it is in the central (largest) circle. Next, click on the screw that can be seen in the upper right corner of the box. Using a knife, unscrew it using circular movements with the mouse.
When you open the box, you will see that the green wire is not connected to the main device. Click on its free end and attach it to the fuse block, holding LMB - the green diode should light up. Now you should take the top part of the battery and insert it into the sleeve using the mouse. Next, close the sleeve by holding LMB and moving the cursor up. Finally, click on the glowing red button to open the door - Kate will automatically leave the room (you will receive the achievement: “end of vacation”).
Search for a doctor
Go left - pass two patients talking near the fountain, another one standing near the door, and two paramedics in white coats. Enter the room to their left (there is a sign with the doctor's name on the door). Talk to the person you find inside. During the polygraph test, answer the questions the way you want. When the test is over (you will receive the achievement: "One Flew Over the Cuckoo's Nest") the doctor will tell you that your things are in the box. Go to the tall chest of drawers in the corner of the room.

In zoom mode, pull out the second drawer by pulling the mouse down and take your clothes.
Combine the key with the lock
Walk left until you reach a dark brown door decorated with metal decorations (located to the left of the squatting patient). In zoom mode, use the key you received from your doctor. The key looks rather unusual - however, use it on the left lock. Then, in another zoom mode, click on the gear icon in the active spot in the middle of the key. A puzzle will appear. You will have to manipulate the individual key fragments to make them match each other. To do this, you need to drag the ends of the fragments into the corresponding castle structures. Below you can see what the key should look like.

However, even after completing the puzzle, the lock will not open. Call up the inventory after talking with the doctor, move the key to the central slot and check it carefully (key “3”). By moving the mouse right to left, you can turn the key and see its lower part. After examining the item and the hole, Kate will realize that the key is incomplete.

Exit zoom mode and go to the doctor's office. Check his desk (interactive icon on the chair) standing to the right of the polygraph. After scaling the box, click on the items on the right and start dragging them to the left until you see a brochure with a red building on the cover. Take it and study it - you will see a picture of a key. Click on the interactive dot at the top of the key, and when the icon appears, click on it so Kate can see what the missing part looks like.
Now you should go to your room and chat with Kurk. During the conversation, show him the brochure you found earlier. He will tell you that the blacksmith living in his settlement can easily create the required part. The drawing can be sent using a messenger owl, which often flies to Kurk so that he can send letters to his tribe. Get out onto the balcony and try to call the bird that is sitting on the roof of one of the buildings in the distance. She won't pay any attention to you. Talk to the young man again. He will tell you that the owl is many years old, and therefore it may well not hear you. You need to find a way to attract the bird.
Go out into the corridor and return to the chess players. You will see that one of them fell asleep right on the bench. Check his pockets and take the key. Use it to open the cage containing the mechanical birds and take one of them. Return to the room and place the bird on the balcony. An owl will notice this amazing product and immediately fly up to you. Give the brochure to the owl and go into the room.
You will notice how Kurk is given a dose of some kind of drug. Talk to the manager - Olga Efimova - in high spirits. This conversation will lead to a rather unpleasant result. As soon as you wake up, go to the owl and take the part for the key from her. Now you can leave the department.
Talk to the receptionist, who will tell you that the hospital has decided to enter a closed regime. Go to the chief physician of the medical institution, Dr. Zamyatin, who is also its manager. Tell him about Efimova’s inappropriate behavior. He will not believe your words, but will not get angry, but will simply give advice to return to his room.
Head to Efimova's office and eavesdrop on the conversation between Olga and the mysterious colonel who is interested in Kate. You will also be able to find out that detective Cantin from America is scheduled to arrive here soon, who is also trying to find the main character. Wait for the manager to leave her office, and then make your way inside. Turn on Olga's computer and read the latest emails. Take a closer look at the squid picture located in the upper corner of the screen. Suddenly Cantin will contact you and tell Walker some interesting news.

Go to the knight model and interact with the lever on the wall. A tooltip will appear indicating the shield and sword hilt. On the last one, bend the clamps (on the left side) so that you get a squid. Inside you will find a clue to solve the puzzle on the shield. You need to rotate the pebbles on this object in a certain order in order to see these colors:

You will be able to open a secret passage. Walk through it, and you will notice how Olga, together with some doctor, is pouring fuel oil directly into the water, which flows through the canals into the local reservoir, near which the Yukol camp now stands. After the villains leave, get out of your hiding place, pick up the canister and fill it with acid from the barrel standing in the far corner. Douse the chain attached to the boat with acid, then board it and sail down the canal into the unknown.
Chapter two
Water purification from fuel oil
You will be able to take a boat to the Yukol camp. Warn them about the contamination, telling them not to drink the water under any circumstances. However, this will still not be enough, because people will die without water, so Kate will have to take on cleaning it. Head towards the dam along the path that runs along the reservoir. The girl needs to adjust the 4 valves of the dam in such a way that the arrow of the water flow pressure indicator falls into the green sector. The solution to this puzzle is as follows (from top to bottom):
- close the first damper;
- open the second damper;
- third damper – fully open;
- fourth damper - close.

Return to camp and report your success to the Yukols. Go to the tent, explore the market area and talk to Ayahuasca about what the tribe is going to do next. Don't forget to mention Kurk. The shaman will ask you to help Kurk get out of the medical facility. To do this, you need to get into the city and get a prosthesis for Kurk from the master.
Passage to the city
Enter into a dialogue with the guard at the checkpoint - he will refuse to let the girl into the city without the appropriate stamped document. Enter the checkpoint and examine the stamp making device. Unclench the fastenings on it to get a leather tablet with the required stamp imprinted on it, and a sponge for ink.
Head back to the tent and on the way there, turn onto the path on the right, which leads to a pond. On the shore you will see a dead squid lying in a blue substance. Interact with it using the sponge to get ink. Continue towards the tent. Enter it and right next to the entrance, go up the stairs to the upper level. Take wax candles from the box. Go down and find the blacksmith in the market square. Show him the stamp mark and give him the candles. In just a couple of minutes, Kate will receive the seal of Valsembor in her hands. Next, chat with one of the merchants, who will agree to give the heroine a pass that does not have a stamp on it.
Go to the checkpoint and prepare a device to create a copy of the required pass:
- Place the leather tablet in its place.
- Then place the unstamped pass there and close the clips.
- Place the sponge with ink in a kind of “spoon”.
- Set the seal and lower the lever on the right side.
- Place the sponge over the area where you want the stamp to be placed.
- Press the main lever (located on top).
- Move the “spoon” with the sponge to the left.
- Press the main lever again.

After this, a person who is familiar to Walker will enter the checkpoint. As a result, the girl's hands are tied, and she has very little time left to escape. You can cut the rope using a piece of glass. First try dropping the bottle on the shelf. It will fall, but will not break. Next, use the lamp on the table. Select the desired fragment and free yourself from your bonds. Exit the building and show the document to the guard. He will let you into the city. The “old acquaintance” will chase after Kate, but the yukols will prevent him. Next, adventures await you in the city.
Chapter Three
Finding a cure for the watchmaker
Once in Volsembor, Kate will immediately hear conversations of local residents near the shore, who will now and then talk about problems on the Crystal ferry and the monster that has appeared on the lake. Near the ferry you can talk to the captain, who is completely drunk. Go to the tavern (you can skip it) and find out where you can find Steiner, the famous scientist and watchmaker who made a prosthetic for Kurk when Dr. Zamyatin asked him to do so.

Go to the watchmaker's shop. He sees a medallion on Kate and immediately recognizes it as an automaton heart created by Hans Voralberg. Steiner will report that Hans was his mentor and good friend. Unfortunately, the old man will not believe you that you are also his friend, and therefore will suspect you of theft. After this, the watchmaker will become nervous and feel ill. We need to quickly find a cure.
Look around the room and take the mug. Next, go down to the basement and go to the workbench, on which there is an almost finished prosthesis. Above the workbench hangs a reminder to take pills 3 hours before lunch. Unfortunately, the Russian localization played a cruel joke on the players, since the translation of the note falsely hints at the time before lunch, which usually occurs at 2 o'clock in the afternoon. Go to Steiner and find a blue illuminated watch behind his back. Place a mug on them and set the dial to the following time: 17:00. After this you will receive the medicine.

The watchmaker will thank you and inform you that the Yukols are going to pass through Barapur. Then he will want to show you a documentary about the tragedy that happened in the city, but there will be no film in the projector. You will be able to find it in a box lying on the floor next to the entrance. You will learn that the ferry "Crystal" and Captain Obo were able to play a huge role in those sad events. Kate believes that the Yukol tribe can be transported to the right place using a ferry, but to do this, she will first have to convince the captain to help the Yukol. Steiner will tell you that his granddaughter works in a tavern, where you can often see the desired sailor. That's where you should look for it.
Removal of coal from the warehouse
Before going to the tavern, climb onto the rusty ferry and read the diary belonging to Captain Obo (it is not at all necessary to do this, but this way you will get a rather compelling argument when talking with the sailor and a new achievement). At the inn, find the drunk Obo sitting at the last table on the left side and talk to him. You won't be able to reason with him. Approach Sarah and ask her for help. Give the captain a sobering liquid to start a more constructive dialogue with him. As a result, you will be able to enlist his support in transporting the yukols. Climb on board and receive the first order from the captain - you need to load coal onto the ship. He will also give you the code for the warehouse where the coal is stored and the crane: 0509.

Get off the deck and open the coal hatch located on the bow of the ship. Go to the huge warehouse gate and enter the above code. To the right of the entrance you will see a trolley. Take the chute behind the mesh (examine it in your inventory) and the crowbar lying near the box. Next, follow the instructions below to load the coal:
- Tap the coal boxes with the crowbar (the full one is on the right and is the penultimate one in the row).
- Push the trolley towards the required box. Examine the box in zoom mode (if you are playing on a PC, press the “3” key) and install a gutter on it.
- Click on the right button on the box to start loading coal into the trolley.
- Interact with the lever that changes the position of the rails.
- Try to push the trolley, but Kate will not be able to move it.
- Sit in the equipment located behind the trolley. Use the knife on the top left button and remove it.
- Use the removed button on the lower right switch, and then click on it (it should light up green).
- Press the lever to make the car move forward.

In the end, you will be able to remove the coal from the warehouse, but now it must be loaded onto the ferry. Go to the tap and enter the previously specified code. Climb into the cabin and grab the trolley. For this:
- Push the lever on the right all the way straight forward.
- Then rotate it around 25 percent to the left.
- Click on the top button.

The coal is loaded - well done. The captain will praise you for your work, and then give you a new assignment - you need to start filling the ferry tanks with water. Go to the bow of the ship where the pump is located, turn the handle and insert the hose into the hole. Climb the water tower and open the drain. Work is done.
Finding a key from a ferry model and creating a copy of it
However, a new problem will immediately arise. The captain will tell you that he does not have the ignition key, and will add that Steiner may have a copy of it. Go to the inventor, where Sarah will meet you and tell you that the watchmaker went to the hospital to see Kurk. Get permission to view the model ferry and head to the ground floor.
- You can get the key from the ferry model as follows:
- First, press the button located on the model’s stand to turn on the backlight.
- Insert the crank you received from Sarah into the side hole and twist it all the way until you can see the entire model.
- Read the instructions and remember the numbers 30, 80 and 60.
- Enter these numbers in the order presented on the wheel, and then turn the pointer to the right all the way (where, in fact, the number 100 should be).
- Manually lower the chain and anchor all the way down.
The resulting key will be too small, and therefore will not be suitable for a real ferry - you will have to create a large copy of it. Go to the device located on the workbench and find under it a box with blanks for keys. Take one of these and start creating a copy:
- Open the round door on the left side and insert the key from the ship model.
- Press the button on the inside of the mechanism so that the fastenings capture the key, and then close the door.
- Open the door on the right side and insert the workpiece there. Specify size: 200 percent.
- Turn on your device.
That's it, now the ferry "Crystal" is completely ready for work. All that remains is to tell the captain about this.
Underwater work
Next, go into the captain's cabin and start the engine. A new problem will arise - Obo will inform you that you need to unlock the locks in order to go into open water, and for this you need permission from the mayor. Run to the mayor's office and talk to the mayor. The mayor will grant your request. Return to the captain and tell him the good news. He will say that now you need to go to the barn and take the diver's suit. Head to the lighthouse and enter the building. Take the necessary equipment, not forgetting to grab the air cylinders lying on the floor on the right side of the entrance.

Try to fill the cylinders with air. To do this, close the bolt next to the handles and pull the lever. But you won't succeed. Look to the left - there you will notice a shield on which the pressure will be marked and buttons are located. Set the pressure to 180, and then press the green button. Now you can refill the containers.
Put on your diving suit and dive into the water. Next to the right bolt mechanism, you just need to turn the valve and pull the lever down. After this, the first gateway element will open. Next, head to the sunken ship and take the chain. Swim to the second bolt system and pick up the gears. The largest of them should be placed on the left, the standard one on the right, and the stepped one on the bottom. Then place the chain and start turning the valve. Finally, pull the lever. A short cutscene will be shown in which the Yukols will manage to break through the cordon and get on the ferry. You will have a new task: to bring Kurk to the ship.
Help Kurk leave the hospital
You need to go to the funicular located in the city. It’s quite easy to find him, as he stands out from his surroundings. Not far from the place where the cable car is located, find a cart and push it. Then select 3 wedges of wood. Go to the cable car operator's cabin and try to open the door. Place the wedges as shown in the screenshot below. A small wedge must be placed on the wedge on the right side to pry the door off its hinges.

Open the shield with a knife and pull the lever. Go to the control panel and pull the lever down. Now you can enter the funicular itself, which will immediately take you to the top.
You will see a helicopter on the way to the hospital. Try to enter the medical facility, but soldiers will stop you. Go outside and walk around the helicopter. Climb aboard it and find a box in it containing a walkie-talkie behind the helmet. Enter the hospital again and use the walkie-talkie, choosing the dialogue option associated with the American woman. As soon as the military leaves the building, go through the corridors, where Doctor Zamyatin will meet you. Talk to him and then talk to the wounded Steiner.
Leave the doctor's office and go to Efimova's office, where Kurk lies. On his chair you will see a pile of papers, which is secured with a paper clip. Take the paperclip and go around the chair with the young man. Open the back panel and use a paper clip on the mechanism. You will be able to gain access to the system for administering a tranquilizer. Remove the needle and pour out the contents of the “syringe”. Next, pour the tincture that the shaman gave you into it and inject it into Kurku. Pick up a small figurine on Olga’s table and go back to the Yukol’s chair. On the side of the young man’s left hand there is a panel for entering the code. Hit it with the figurine to remove the handcuffs from Trigger. Now run with him to the funicular, and then go to the ferry.
Chapter Four
Departure of the ferry "Crystal"
Talk to Obo. He will ask you to go to the engine room and activate the ice pick system. Go to the passenger compartment and take the matches belonging to the Yukols. Go to the room to control the ice axing equipment. First, turn the upper right valve and put the lever in first gear. Then press the button, pull the lever down, put it in third gear, and finally in second.

After this, you will be attacked by a huge octopus. It is necessary to destroy all the spotlights located on the ship. To do this, you should find a crowbar - it is located on the left side of the ship not far from the boat. Having broken all the lights except one, you will stumble upon an obstacle in the form of a monster. Head to the passenger compartment and look for a box on the floor containing an emergency flashlight. Use a light source near the kraken to distract it. Then go to the last spotlight and destroy it.
The giant squid will not stop destroying the ferry, so run to the compartment where the ice pick control panel is located. There, on the right side, find the lever and pull it down to turn off the motor. But this won't help either. Find the captain fitting out the boat. Obo is going to distract the octopus from the ship. Go to the lower level to take the lamp - it will be on the table.

Another problem will arise here - the lack of fuel. Go to the captain's cabin, but don't go up the stairs. Along the way you will find a shelf with books scattered everywhere. In one of the books there is a bottle of alcohol. This will become your lamp fuel. Fill it with liquid and then use the matches you found earlier. Now put the plan into action.
The ship will run aground right next to the pier. It will be necessary to check the background radiation. Go to the bow of the ship and find the device, but you will need a key to pull the lever. Head to the control room, where the steering wheel is located, and pick up the ignition key. Insert it into the unit and pull the lever. This way you can take points. Go out onto the pier and go down the boards to the ground. Then you need to go to a small building on supports. Take the telescopic rod with you and return back to the pier. Use the rod on the large cable at the top. Next, talk to Burut.
Baranura Park
Approach the automaton lying behind the destroyed part of the pier and look at it. Then take the key. Visit the nearby building and find a small chest there. Use the recently found key on it. As a result, you will find a wrench and a Voralberg key. It is also worth paying attention to the map, which shows the route and mysterious Roman numbers.

Find another door and go through it. You will see yukols. Examine the location and find a metal rod lying next to the bench. Open the gate to access the beach. Go to the automaton that sits right on the bench. Unlock its roof using Voralberg's key, and then insert Oscar's heart into it. Connect the “arteries” of the machine with the valves on the heart. Try to unscrew the bolt using a wrench. Then you realize that you are missing your activation key.
Climb the left ladder and approach the gate. You will hear a strange sound, and then you will see transport from a roller coaster. Go through the gate and turn right. Then go up the stairs. You will be able to take a closer look at the car and the rails. Examine the instrument panel: it has a scale with a maximum value of 50 units and several holes. Here you need to remember the previously found map on which Roman numerals were written. First of all, you have to start the vehicle up to 50 units, and then install a metal rod in one of the holes. Next, pull the activation lever. The booth will stop at the place where the rod points.
In general, to solve this puzzle you need to remember the symbols indicated on the map: 15+25. Therefore, you first need to unscrew the arrow to 50 units, and then insert one of the metal rods at a value of 25, and the second at 15 (this rod can be found on the right side of the control panel in the car). Pull the lever to stop at 25, then remove the rod and drive to 15. This is your final stop.

You will find yourself next to rocket models. Exit and find the stairs leading down. Go down and explore the new location. Climb into the carriage and look at the photo album. As you exit the carriage, you will run into Ekaterina. Talk to her and ask her to give you the key. She will hand over the item. Return to the machine and remove the rod installed at number 15. Now you should talk to the yukols and go to the beach area to the automaton.
Start the robot using Catherine's key and enter into dialogue with Oscar. He will ask for clothes. Go through the gate on the left side leading into the park. There you will find a passage to the subway. The rubble was cleared by yukols, so you can get inside without any problems. Go to the carriage where Catherine lives. Oscar will come after you, who will put on the clothes he found in the girl’s locker. Now head to the pier. If you have not yet provided electricity to the park using a ferry, then go from the compartment where the control of the ice ax device is located and turn on the power to the crystal.
Ask Oscar to tow the crystal, but nothing will work. Talk to the Yukols and tell them to tie the rope to the Ferris wheel. You should get to the control panel in advance and install the gear in the mechanism. Once the cable is firmly tied to the structure, press the button to start the wheel. As a result, you will be able to tow the crystal.
Chapter Five
Baranura Metro
You will find yourself on the subway with the tribe, but your path will be blocked by bats. You need to try to drive them away. After several attempts, the girl will be convinced that this can only be done outside, but there is too much radiation there. Talk to Oscar and ask him for help. After this, control will pass to the automaton. Get outside and find the Historical Center. There will be a fire truck standing next to it. Sit inside and find the ignition key in the glove compartment. Start the car and pull the lever. As a result, you will move even closer to the complex.
Next, get to the ladder control panel. Point the arrow directly towards the ventilation passages. Lift the ladder up and climb it to the roof of the building. You won't be able to unlock the grate, so you need to go downstairs and find the Bank. In it you can pick up powerful nippers. Return to the roof and open the grate. Then head to the fire hydrant and remove the plug from its inlet. You also need to remove the pin from the hose reel and install the hose into the hole that appears.
Deal with the dog and return to the subway to the girl. Unfortunately, Oscar received a strong dose of radiation, but Walker knows where to find algae rich in iodine. You can find this plant in the same location - you should approach the Yukol camp, go right and go down the stairs to the river. This is where you will find algae. Then control will pass back to Kate. Cross the train tracks and go up to the table. Take the necessary items from it and watch the next cutscene. Go to the surface, talk with the shaman and Kurk, and then go through the gate indicated in the screenshot.

Go upstairs using the escalator, explore the corridor and find another escalator at the end of it, along which you can go down. There will be a huge staircase leading to the lower level. As a result, you will find yourself near a new gate. Get out and find the house where Dunyasha Dubrovskaya lives. She will give you a notebook for Kurk. Return to the young man and give him this thing.

Talk to Kurk and run through the parking lot along the small structure on the left side. On the other side of the path you will notice a turn that leads to a new door. Behind them you can find a swimming pool. Approach the springboard and examine the 3 round depressions. Go down and examine the stones. Now it’s worth going back to the yukols. There you will learn that you should install lenses in place of the depressions.
Solving the lens puzzle
The first step is to start looking for 3 lenses. The first of them (red) can be found if you send Kate along the corridor leading to an escalator, along which you can go down. Halfway through this corridor, you will notice a turn on the left side that will lead you to large doors. Go through them and you will find yourself in the hall of fame. Go to the cabinet with a glass door. It contains the red lens. There is a scarf in your inventory. Use it on the door to make the girl wrap her hand in a scarf and break the glass panel. Then take the lens and return to Dunyasha's house.
On the right side of the house you can find a cave in which there is a second lens (green). The third lens (blue) lies on a chair standing in front of a huge staircase, along which you can go down and thereby get to Dubrovskaya’s apartment.

Then you need to enter the characters as in the screenshot. You can find the clue in the notebook you received from Dunyasha and translated by Kurk. Basically, you now have all 3 lenses. Go to the pool and go up the diving board. Then place the lenses in the sockets. The correct location of the mirrors is as follows:

Go to the temple entrance and watch the cutscene. You will be taken to a new Yukol site. Talk to Kurk and head to the customs post located in front of the bridge. Talk to the guard, who will tell you that you need to lower the big wheel down.

Pull the lever to raise one part of the bridge. There is a stove behind the customs post. Take resin and funnels from it.

Approach the customs officer again - he will help you cross the bridge. We cross the obstacle and talk in the yurt with the guard. He will ask you to bring him vodka. Go back. You will see a guard leaving his duty station on a motorcycle for strange reasons. Take the brick next to the track stopped by the motorcycle, go around the checkpoint and break the glass on the door using the stone. Get into the building and find the customs officer's papers and a flask lying in a basket.
Solving the oven puzzle
Go to the stove and open its bottom door. Place the log right in the middle, and place a piece of paper under it. Light a fire using the flint found in the basket in the ostrich house. Head towards the lever that lowers the wheel into the water. A little further away you can find a passage into the room. There you need to press the red button. A container will arrive from the opposite bank. Throw the flask at it, and then click on the button again to send the box back. In a couple of minutes the container will return with bags of sawdust. Take them with you and return to the stove. Place the bags in 4 boxes. Then remove all funnels from the chimneys. Here you can see a hint:

You should also remove all resin from the chimneys, including the yellow one. There is a stump nearby where you can use a knife to cut the blue resin. Your goal is to scatter the pieces of resin along the chimneys in the correct order. If you carefully study the clue, you will realize that the left chimney is powered by a red piece, the two chimneys in the middle are powered by blue pieces, and the right chimney is powered by a yellow piece. Place the resin in such a way that there is an open area under the grate where the holes are located, which can be twisted using a handle. This area should have resin placed directly above it:

Did you notice in the screenshot above that the valve is in a horizontal position? So, it should be installed in a vertical position. This must be done for all chimneys. On the left side of the stove, find a blower. The valve must be left open, that is, horizontal. Next, deal with funnels. To do this, turn the camera and you will see the back wall of the stove. In the left chimney place funnel number 4, in the next one - funnel number 3, then funnel number 2, and at the end - funnel number 1. Make sure that the blowers are in the right position and complete the puzzle.
The guard will decide to bless the Yukols for the crossing, after which you will be shown the final cutscene. The Yukols will be safe, but Kate Walker will be captured by Olga and the military. Now we have to wait for the plot addition or the fourth part. We hope that this time it will come out much faster.
Goal: Find a way to measure radiation
We were hit by a wave, and while we were unconscious, the yukols managed to take the ferry to the shore. True, we sailed not to Snezhinsk, but to radiation Baranur, and besides, we ran aground. The first thing we do is check the background radiation before going ashore.
1. We go along the deck to the bow. There is a round sensor on the hill; it shows normal radiation. You can take anti-radiation glasses from below, but the mechanism is blocked. We examine the left side, there we see a keyhole.
2. We go to the cabins, go up to the captain's cabin, take the ignition key.
3. We return to the sensor, insert the key on the side, and press the lever. In the lower tray we take the fallen anti-radiation glasses. On the shore, the background is also normal.
Objective: Restore power to the Crystal
We go down the ladder. The local pier is broken in two, with wires hanging nearby. We go down the side board onto the sand. There are many dead robots around.
1. On the shore we go to a wooden building, climb onto it, find telescopic rod.
2. We return to the pier. We use a long rod to pull out the wires from the pole. Yukol Burut volunteers to help us, he will connect the wires to the ferry.
3. We go to the ship, go down to the engine room, and turn on the lever to the right of the ice pick mechanism. Electricity will be provided to the entire Baranur Park.
Objective: Repair the automaton
An almost intact ZX2000 automaton sits on a bench at the entrance to the park. We can revive it with a mechanical heart, but its body is still closed, we need a cross-shaped key.
We enter the gates of the park. On the right we can climb the stairs to the roller coaster platform, here we find the document “Crumpled Note”, where there are several calculations of the speed and distance of the attraction.
On the left side in the park we can enter the building where there is a broken conveyor belt with robots. There is a locked chest on the table, and a poster with the route of a roller coaster on the wall.
1. In the building, we exit through another door and find ourselves on the broken part of the pier. We go to the end and inspect the tractor. We take the automaton out of the car and find a small key in his hands.
On the way back, at the turn, we inspect the overturned car. We try to unhook it, but it falls off the pier.
2. We return to the building with the conveyor, open the chest on the table with the found key. Inside we take the cross Voralberg key, wrench . At the exit we will meet the Yukols, they followed us, and now they have occupied the entire park. But the ostriches have not yet been unloaded.
3. We return to the sandy shore. We examine the automaton on the bench, use the key to open its case. Inside we disconnect the old heart and install Oscar’s mechanical heart. Open two valves on top and insert tubes into them. On the large round thickening we use a wrench and move away the round cover. Inside we see that we also need a small key to start the heart.
Goal: Find the activation key
We return to the park, at the entrance we hear that someone drove on a roller coaster and left the car on the site.
1. We go deep into the park, to the entrance to the metro. From this place we go to the left, we pass between the figures of a red rocket and an elephant. Near the hole in the mesh fence, under the bench lies metal rod.
2. Near the entrance gate of the park, we go up the stairs to the roller coaster platform. Now there is a car number III here, let’s get into it.
3. In the car we inspect the right adjacent seat, there we take another one metal rod.
We examine the dashboard, there are a couple of levers and a dial showing how much time is left to travel. We read the solution to the puzzle in a crumpled note.
1. Use the left lever to set the arrow to the maximum value of 50.
2. We place metal rods on the numbers 25 and 15.
3. Lower the right lever to start moving.
4. When we reach the number 25, we pull out the blocking rod. This stop was needed simply to slow down.
5. We reach number 15 and get off at this stop.
We are in a cramped room with mock-up rockets. On the right we find a hatch down and go down. We find ourselves in the subway. If you go to the right, you can see a blockage at the entrance. Let's go lower. There is a train on the tracks, we enter an open carriage.
Inside is someone's home. We find a photo album on the table, and it’s better to read it right away to find out more about the owner of the shelter.
When we try to get out of the carriage, we will meet a woman accompanied by a mechanical dog. We see how she starts the dog with a special key. We persuade her to give us the activation key.
Objective: Complete repairs to the automaton
We return upstairs, get into the attraction car, take out the rod from the number 15, and drive to the starting area.
We communicate with Kurk and the shaman waiting for us here. The Yukols are going to fulfill our request - to clear the path to the subway (we can go to the far door and watch them dig).
We return to the sandy shore. We start the robot's heart with the found key. The robot will come to life and have Oscar's personality. Thus our old friend came back to life. But he is in no hurry to help us; first he needs to get clothes to cover his bare metal.
Goal: Find clothes for Oscar
We return to the park. We go deeper, go into the farthest door. We see that the yukols have already cleared half the way to the metro, but now they are gone. A person can already pass here, so we go down to the metro along this path.
We discover the missing workers in Katerina’s carriage; they are sitting together and listening to a melodrama broadcast on the radio. We send the Yukols to work further. We give Katerina the key, ask for clothes for the robot, we get key to Andrey's closet. When we examine the clothes, Oscar will appear and put them on.
On the way back, near the rubble, we meet Kurk, going down to the metro. Be sure to talk to him to get the achievement.
Objective: Help Oscar tow the Crystal
We go into the building with the conveyor, through it we exit to the right side of the pier. Oscar is already sitting in the tractor. We approach him and explain the task. He will ask you to turn on the electricity, remove the car from the path, and tie the ship's cable. The first two conditions can be made in advance, then Oscar will praise us.
We go directly to the ferry; the Yukols have already restored the collapsed part of the pier. We ask the Yukols to tie the ship to the tractor with a cable. We return to Oscar, we command to start towing, but nothing happens.
Objective: Find another way to tow the Crystal
1. Extend the cable; to do this, inspect the winch at the back of the tractor. We use a wrench to unscrew the bolt, then turn the lever. Oscar will drive his tractor closer to the Ferris wheel.
2. We approach a new place on the tractor, here we tell the yukols to tie the cable to the cabin of the Ferris wheel.
3. We go to the next building on the left, in the center of the conveyor belt we inspect the cardboard boxes, inside we find a gear.
4. On the street, we go around the Ferris wheel on the right, climb the stairs to the wheel control platform. We examine the mechanism on the right, install the gear there, and press the lever. Press the red button on the left. The wheel will begin to spin and pull the ship ashore.
Objective: Get the ostriches out of the hold
The Yukols greet the metal Oscar with caution, but the shaman stands up for him. We go to the back side of the ferry, there we press the opening lever. All the ostriches get out, and we ride them down into the subway. The military arrived by helicopter, but did not have time to notice where we had gone.
8. Metro "Historical Center"
How to pass Siberia 3
Objective: Check the tunnel
At the intermediate station, a flock of bats blocks our path. We are looking for a way to scare them away.
We go up to the right platform, go out into the flooded tunnel, there we find algae under the stairs. On the right, at a dead end, one Yukol will give us a root in the form of a club.
We go up to the left platform, there we find Oscar on a hill, he is hiding from the shaman’s excessive attention. The robot tells us that mice can be driven away by fire, water or noise.
We return to the platform. The carpenter left and left his table unattended. On the table we find a bottle and flint. Here you can make a torch, but first we'll take the last ingredient. We inspect the ostriches in the entrance tunnel, tear off the yukol rag from the yurt. We return to the workbench, prepare the torch:
1. Insert a root stick into the hole in the table.
2. Wrap a rag on top.
3. Pour fuel from the bottle.
4. Set fire with flint.
We go to the bats and try to drive them away with a lit torch. The mice are afraid, they want to fly away, but the ventilation hatches on top are closed, and they cannot fly away anywhere.
Goal: Find how the ceiling vent opens
We return to Oscar, he volunteers to go out onto the radioactive surface and open the hatches. Now we control the automaton. We leave through the airlock chambers.
|
I am not her(I'm somebody else) Admit it: you didn’t expect this... Plot. We'll get it when we start managing Oscar. |
|
|
How ironic, right?(Ironic, ain't it?) Admit that you really wanted this after leaving Valadilen... When we start playing as Oscar, we immediately try to return to Kate, press the red button several times, listen to the dialogue. |
Objective: Open the vent for Kate Walker
We go out into the street and examine the dead city. We enter the cooperative store, inside there are two mechanical dogs and a stand with tools, where there are not enough wire cutters. A little further between the houses you can look at the shore through a telescope.
2. There is a fire truck with a ladder in front of the metro building. We sit in her cabin. On the right we inspect the glove compartment, find the ignition key. There is also a child’s drawing signed “Sara” (apparently, Sarah’s father and Steiner’s son worked as a fireman and died during the rescue operation). We insert the key into the keyhole and start the car. We press the lever to drive closer to the hatches on the roof.
3. We get out and climb onto the body of the car. On the control panel, we turn the ladder towards the metro building, raise the ladder with the lower flywheel, extend it with a lever, and lower it lower to the hatch itself.
4. On the roof, use wire cutters to remove the grille from the hatch.
Goal: Escape from mechanical dogs
The job is done, but we are prevented from returning by two running dogs. We inspect the hydrant and prepare it for use:
1. Remove the locking hook from the hose reel.
2. Open the lid under the hydrant in front.
3. Unwind the hose and insert it into the connector under the hydrant.
4. Turn the valve slightly above the connected hose.
5. We pick up the barrel of the hydrant. We drive away the dogs.
Goal: Join Kate Walker
We go through the doors on the left and go down to the subway. At the airlock we close the doors behind us, the radiation cleaning system will turn on. But the procedure stops in the middle, there is not enough iodine supply for decontamination.
We begin to control Kate. We can get iodine from algae that grows near the river. We insert the algae into the receiver, the device itself will extract iodine from it. Oscar will come to us.
We return to the platform, approach the carpenter’s table, take the flint, and Kate will light the torch again. We scare away the mice with fire and go to the next metro station.
9. Temple of the Red Moon
Siberia 3. Puzzle with light
Objective: Meet with Kurk
We stopped for the night at the exit of the Olympia station. We are offered to spend the night in one of the yurts, but we refuse. Behind the round pen we can go up to the distant ostrich and pet it.
We communicate with Kurk and the shaman. We learn that an ancient temple is hidden under the stadium building, we need to find the entrance to it.
We find an open grate in the building, enter, and go up the escalator. We go left along the corridor. Halfway up there is a buffet lined with sports cups. We reach the left escalator, go down, and go out into the backyard.
We walk along a mountain path, along the way we read the inscriptions on the graves of the Yukols. One of the graves has been dug up, but is still empty. We find a forest hut, there is no one inside, but soon Dunyasha Dubrovskaya - Ti Kah, a half-breed girl - arrives. After talking with her, we get the diary of her father Han Ti Kah.
We enter the illuminated cave on the left, read the tombstone, and above it we take the item Yukolov Lens 01.
Goal: Translate the Yukolov manuscript
We return to Kurk and ask him to translate the text of the diary for us. He translates it, but not into Russian, but into English, so you can only navigate by pictures where important objects are hidden.
Objective: Find the secret temple of the Yukols
We leave the camp, go left along the wall. Ahead there will be a path back to the metro, where we don’t need to go, but before reaching it, between the fir trees on the left there is a path to a separate swimming pool building.
Inside the building we go down to the bottom of the pool and examine the recesses in it. We climb onto the springboard; there are three notches in it. Three colored lenses need to be installed here.
1. We can immediately place in the center the green lens 01, found in a cave near Dunyasha.
2. We return to the stadium building, on the second floor we enter the buffet. Now Kate will look at the red lens 03 behind the glass. We use Sarah's scarf to wrap our hand and break through the glass. (Although, it would be more logical to take any nearby chair and break through the window without getting hurt, but this is not available to Kate).
3. We go to the far escalators, go down, and then go up the central staircase. There is a red chair on the intermediate platform, we examine it, and open the panel from below. We see a combination lock of six Jukol symbols. We read the clues in the translated diary, enter the symbols. Inside the chair we take the blue lens 02.

4. We return to the pool and install the lenses. We examine the colored stones on the far wall, we need to send colored rays into them. We rotate the mirrors and prisms so that the light reaches the desired stones.

|
The Abandoned Temple Robbers(Raiders of the lost temple) By solving the riddle, open the doors to the temple in less than 20 moves. Ideally, 12 moves are needed, so you can make 8 mistakes. |
|
|
Oh, spirits, are you here?(O spirits, are you there?) The spirits have given you a blessing... and a sacred path! Plot. We take part in the Yukol ritual in the temple under the stadium. |
10. Sacred Bridge
Siberia 3. Puzzle with smoke
Objective: Meet with Kurk
While we were sleeping, the yukols reached the border. At the very beginning, we return to our yurt, examine the box, take a knife and flint from it. There is a bridge ahead, go to the right of it, go around the large stove, and find Kurk on the cliff. The sacred bridge has been destroyed, and to cross the modern bridge, you need to know the opinion of the guard on the other side.
Objective: Meet the Guardian on the other side
We go to the next building. First, we go down two stairs and press the lever at the bottom. The water wheel will lower into the water and raise half of the bridge.
After that we go to the top floor. We approach the back door of the checkpoint, but the guard does not let us in. We walk around the building and communicate with the border guard through the front window. In the conversation we convince him to let us cross the bridge.
Goal: Find some booze for the Guardian
We enter the yurt and communicate with the Guardian. He asks to bring him vodka as a gift for the spirits. Then you will need to communicate with the spirits using fire and smoke.
1. We return to our shore. The customs officer lets us through, but then quickly leaves on a motorcycle, obviously to notify his superiors. We examine the place where the motorcycle stood and select a brick.
2. We approach the back door of the customs office, use a brick to break the glass, and get inside. We examine the bag on the table and take it from it. customs officer's flask with vodka, you can take it in the next room customs officer's papers.
3. We go out into the street, go down, on the intermediate floor we enter the room, press the button, a hanging basket will come to our side. Place a flask of vodka at the bottom of the basket. Press the button again to send the package to the Guardian. Soon the Guardian will send us a reply bags of sawdust.
Objective: Offer a prayer to the spirits
We go to the ostrich camp, find Oscar, and near him we climb into the shaman’s yurt. We ask her about the ritual, she will tell you about the colored smoke from the stove. We examine her chest and find a wooden Ayahuasca rod.
We go to the furnace behind the checkpoint building. Open the cabinet below and take log, three funnels, set of colored resin. We open the pipes from above, they still contain three pieces of colored resin. Fourth funnel lies in the stove pipe, on the back side. There is a stump nearby, we place a full circle of blue resin on it, and cut off a quarter with a knife. We can begin the ignition process itself.
1. Place a log in the bottom center. We put the border guard's papers under it.
2. Place the shaman’s wand on the center of the table; there is a hint on it - four colored pictures of different shapes. This is exactly the kind of smoke we should get.
3. We look at the back side of the pipes; we need to insert funnels of a suitable shape into them so that they swirl the smoke. We arrange funnels by numbers from "1" to "4", starting from right to left. Close the side flaps of the pipes.
4. Pull out 4 drawers in front, fill them with sawdust, and close them.
5. Place colored resin inside the pipes, from left to right: red, blue, blue, yellow.
6. The resin stand can be lifted, look under it to see where the hole is. The resin should be placed on the quarter that is located above the hole. If you can't put anything above the hole, turn the bottom part and the hole will be in the other quarter.
7. At the bottom of each pipe there is a blower lever, turn all four levers from horizontal to vertical so that smoke can pass through.
8. Only after all this do we light the paper and log using a flint. Close the bottom of the stove.
9. On the left there is a blower, where the smoke comes out from first. We switch the lever on it from horizontal to vertical position. The vent will close and smoke will flow through the main pipes.
In response to our colored smoke, the Guardian will release regular smoke, thereby allowing us to cross. The Yukols will begin to cross the bridge, and Oskar will remain to switch the mechanism. At this moment, a helicopter will fly up and the military will quickly neutralize Oscar. Kate will go to help, press the bridge switch lever, but at the same time she will be captured.
This is where the plot of the third part of “Siberia” ends.
Achievements
1. Cumulative
Siberia 3. Achievements
Most of the achievements relate to the plot or to optional plot-related activities. All of them are described directly in the text of the walkthrough. This section contains only the remaining cumulative achievements.
|
A compelling argument(Martingale) During an argument, provide irrefutable evidence that you found while studying the world around you. There are three ways to get the achievement: 1) We find the captain’s diary, only after that we begin to persuade him to help, using the phrases: “Flattery,” “Walsembor needs you,” “I offer redemption.” 2) We talk to the crowd of protesters. And when we talk with the mayor, we choose the phrases: “Sorry for bothering you,” “Leave the city with the Yukols,” “Think about the elections.” 3) In the subway car we immediately read the photo album, only after that we get out and greet Katerina with the words: “Apologize”, “Introduce yourself”, “Talk about the photo album”. |
|
|
A screenwriter's nightmare(The scriptwriter's nightmare) When completing the game, perform 5 optional actions that will affect the course of the game. You need to perform any 5 of the 8 available actions: 1) Read all the letters on Dr. Efimova’s computer. 2) Read the captain's diary before talking to him. 3) Read the captain's diary before talking with Steiner. 4) Examine the monument to the automaton before talking with Steiner. 5) Read Katerina’s photo album before meeting her. 6) Connect the power before Oscar asks. 7) Remove the obstacle on the road before Oscar asks. 8) Turn on the bridge wheel before meeting with the customs officer. |
|
|
It's time to collect my thoughts(Time to collect your thoughts) Think twice before you speak. In some dialogs, light bulb symbols appear next to the selection lines. Click on them to listen to Kate's thoughts. |
|
|
And this is called cheating...?(You call that cheating...?) Find 15 interesting features of items in your backpack We examine any found item, find the active point on it, click to listen to Kate’s hint. |
The game has two difficulty levels:
- journey, if you only care about the plot and want to receive more hints during the game;
- And adventure- you will receive fewer hints, as was the case in previous parts of the series.
Let's watch the opening video. Kate is found dying on the shore by the Yukol tribe and is rescued. A local shaman brings her back to life with her rituals and she is sent to a clinic. There, some doctor talks to a suspicious guy who asks to keep Kate longer in the clinic.
Kate wakes up in her room. Lying nearby, along the way, is a representative of the Yukolov tribe. The Yukols move with their snow ostriches to sacred lands. The boy introduces himself as Kurk. He also says that their tribe saved Kate’s life and now they are in Dr. Zamyatin’s clinic for treatment. Kate notices his leg, or rather the lack thereof. The clinic doctor ordered a prosthetic leg from a master from Valsembor. We talk with the boy about the remaining topics to find out all the details. Now we need to tell the doctor that Kate has woken up.
Clinic of Dr. Zamyatin
Exit from the ward
It's time for gameplay. The controls here are different from previous parts; now individual keys or a stick on the gamepad are responsible for movement. It is better to play on a gamepad, which is what we are advised to do in the game menu.
We are trying to leave the room. The door turns out to be closed. Kurk advises pressing the bell button near the door. It doesn't work either. Looks like this is the first puzzle on the way. Let's examine the mechanism. There are instructions on the right side of the box. To open, you need to unscrew the screw. We examine the table in the room and take the knife. We return to the bell and open the inventory. We select the knife, it will automatically be aimed at the action that needs to be done, in our case it will be aimed at the screw. We use it, hold down the button and turn the screwdriver with the movement of the stick. I think it’s clear even without instructions what needs to be done. Take the green wire and insert it into the appropriate socket. Now we push down the mechanism with the button. Now the door is open and the path is clear. Let's go out.
Search for a doctor
Let's go left. Strange, seemingly crazy patients can be seen everywhere. There will be orderlies near the doctor's office. They advise you to find a doctor as soon as possible. Let's go inside. Dialogue options now include response options, so Kate can now react differently to what is said. The choice is yours. Doc seems pretty weird. He obliges her to undergo a series of tests that will verify her well-being and determine whether she is ready for discharge. Kate takes a seat and he asks the first question. We answer the truth, because... the chair is a lie detector. Then we answer all questions either truth or half-truth. This way you can find out the story about her family. After completing the tests and convincing the doctor that we can give Kate a chance to leave the clinic, we receive from him a special key with which we can leave the floor. In his opinion, this can be done by those who have truly recovered.
Leaving the clinic
We go behind the doctor's table and take our things from the closet. Now you can leave this place. But before that, you can chat with two interesting patients who play chess a little further from the doctor’s office. We communicate with them on all topics and find out additional information.
We go to the elevator - this is the exit. Open the inventory and select the key received from the doctor. We press the button on the key and it comes into working position. Now you need to arrange all its parts in accordance with the holes. Each "tentacle" has a separate control button. We hold down the button and rotate the tentacles.
This is what the final result should look like
What the hell? The key is broken. The doctor insisted that only those who open the door could leave the floor. Now it’s clear why these patients have been here for decades. Open the inventory, select the key and examine it. We notice that it is missing some part, there is an empty hole on the tube. We go to the doctor's office and interact with the table. Kate opens her desk drawer. We sort through the documents until we find a red brochure for the Valsembor clinic. We scroll through it to the page with the image of the key. We open the inventory and take out the key for comparison. The key is missing a pin. We return to Kurk’s room. We show him the brochure. He says that using the original model, the blacksmith of his tribe can make the missing part. On the balcony, he interacts with the messenger (owl), who can send a message. We go out onto the balcony and call the bird to us. She doesn't react at all. We return to Kurk and ask what to do. He advises her to lure her with something. And this is an idea! We go out into the yard and see that one of the chess players is sitting on a bench. He says that Anton fell asleep again in the middle of the game. We go to this Anton, he is really sleeping, we take the key from his neck. We leave and go opposite to the cage with mechanical birds. We use Anton's key on the door. We go in and pick up one “Keshu”. We return to the balcony in the chamber and place the bird on the perch, then click on it. The owl reacts to the bait; it clearly likes its mechanical friend. Message sent.
We tell Kurk that everything is done. He immediately finds himself under the hypnosis of the pendulum. Madame Olga, the head, appears from behind. departments of the clinic. After talking with her, you can calmly leave or start figuring things out. In the second case, you will receive an injection and wake up after a while. In the first one, you can just walk around the yard and come back when the doctor is finished with Kurk. We go out onto the balcony to check how the message is going. The owl has already returned. We take the repaired key to exit.
Kurk got worse. He asks to go to Valsembor and pick up his prosthesis from the master. Then he could put it on and return to the tribe. We head to the elevator. We use the key again, this time the door opens. We go in and press the button.
We go forward to the registration desk. There you can ask where to find a doctor. Doctor Zamyatin is on the left along the corridor, the first door. Kate tells the doctor about what Dr. Efimova does with patients. He refuses to believe it and says that he trusts her completely. We talk with him on all topics, after which we ask Zamyatin to let us go to the master in Valsembor to pick up a prosthesis for Kurk. He says that our doctor is Efimova, so it’s worth asking her. As a farewell, Zamyatin gives a book in which it is written about the Yukols.

We leave the office and head down the screen along the corridor to the half-open door. We notice Efimova in her office, she is talking through the computer with a certain one-eyed Colonel about Kate. Efimova also tells him that an American detective has arrived who is looking for Kate, the same one from the first two parts.
After the conversation, the doctor leaves somewhere and magically disappears. We examine the room. We go to the computer and look at the messages. A video link with the detective will appear on the screen. This is the meeting. From the conversation it follows that Kate is wanted. They believed that Kate had absconded with a contract for the sale of a mechanical toy factory in Voralberg. Having completed this unpleasant conversation, we go to find out where Efimova disappeared.


We approach the knight's armor and interact with it. We pull the handle and drag it down. The curtain opens and behind it you can see a passage with a shield. We examine the sword near the armor. We open the fastenings on the disks and rotate them to compose a picture. It should turn out to be an octopus. The sword rose higher and colored pebbles appeared at the bottom of the blade. There is something similar on the shield in the opening. We remember the location of the colors on the sword and copy their location onto the shield. The secret door opens, we go inside. We go to the elevator, press the button and go down.

Walking forward through the sewers, Kate notices Efimova and Dr. Mangeling. They turned on the tap to poison the water. First, go left and take the old canister. We cross to the other side through the bridge and find a barrel of hydrochloric acid. Open the inventory and select the canister. Let's pour ourselves some, we'll need it now. We go right to the end and find a boat. She is tied with a chain. We use a canister of acid to burn through the chain.


We sit down and leave the clinic. We reach the Yukolov refuge through the dam along the water.
Camp Yukolov
Water purification
Immediately upon arrival, the nomads began to panic and ask Kate for help. On the right we approach three yukols trying to reason with a raging ostrich. One of them says that ostriches drink poisoned water. We need to somehow clean it up before all the ostriches get poisoned.

Later, the shaman Yukolov, who saved Kate’s life, comes up. She subtly hints that Kate could purify the water in the river. We run to the right along the path to the dam. We approach the stairs. There is a sensor on the wall that shows the water pressure at the dam. Our task is to filter the fuel using it. We look at the diagram next to the sensor. It shows that waste, garbage, etc. pass through the upper and lower tiers, therefore, they must be closed. We open the second tier from the top halfway, and set the third to allow water to flow through completely. The arrow of the sensor indicating the pressure will be in the green sector. Everything worked out.


We return to the refuge of the Yukols. At the entrance to the camp we speak with Burut. He asks how Kurk is doing and says that they need to move on soon, because... ostriches will want to move on. After talking with him, we go inside.
Getting a pass
We turn left and head to the shaman. An animal skull hangs above the entrance to her abode. To get to the master in Valsembor, who has a prosthesis for Kurk, you need to get a pass to leave the city. The Jukols are not allowed to go to Valsembor now, they won’t let us through either. Previously, they could use the machine in the hut at the exit of the camp, but then it was broken. So you can only get a pass in Valsembor. But we can’t get there without a pass. This is the situation.
Leaving the shaman, we follow to the right. Along the way we will meet an ostrich that you can climb on. We climb inside along the stairs. In the box on the right among the different temples we find a candle. We'll need her wax later. We leave the tent and head right towards the exit. We find ourselves on the other side of the camp. We go left and talk to the policeman at the checkpoint. He won’t let us into the city, because there are nomads here and, by order of Mayor Bulyakin, entry is only possible with stamped passes. You can try to stab him with a knife, but he will just react to it in an interesting way, it’s cool. Well, you'll have to find a pass. We go into the hut nearby.

We examine the table and see a device for printing. The seal itself is not there. We take the sponge on the left. There was an ink mark from the seal on the leather lining. Open the fastenings on the sides and take away the lining. There is nothing more to do here for now. We leave the hut and head to the camp. We find it there. We ask him to help us get a pass. He gives us his wife's pass. All that remains is to put a stamp. Now we find a blacksmith nearby. To create a seal, he needs an example. We open the inventory and give him the seal lining. Then he needs wax for casting. Fortunately, we already have it. We took it earlier. The blacksmith reports that the seal will be ready soon. We take the seal and leave the camp towards the checkpoint. Let's go right. Near the shore we find a squid in a pool of ink. Let's borrow a little. Open the inventory and use the sponge. We return to the hut to stamp the pass.

We interact with the table. We put the lining in place, the pass itself on top, then fix the sheet with fasteners on the sides. We return the sponge with ink and turn the holder to the right. We lift up the lever on the right, which holds the seal in the slot. We insert the seal and lower it down again. We go back one zoom level and pull the topmost lever to dip the stamp in ink. Let's return to the study of the pass. We move the sponge holder to the left and pull the upper lever again to stamp the pass. Hurray, now you can go to Valsembor! Don’t forget to pick up the pass, first opening the fastenings.


Suddenly, out of the blue, an American detective, Mr. Cantin, enters the hut. He intends to arrest Kate, he has a warrant. Choose any option in the dialogue that you want. Then you can deceive him or call for help. Either way, he'll walk out the door. There is a glass bottle on the counter. What if you drop it? Unfortunately, the bottle falls on the carpet and does not break. There is a lamp on the table that can be dropped on the bottle. That's what we do. We select the fragment closest to us (left). After liberation, we leave the room and approach the policeman. We give him a valid pass. Now he has no choice but to let Kate into Valsembor. A detective appears behind us, but our friends, the Yukols, help us deal with him. Hehe.
Valsembor
Help for a watchmaker
Immediately in front of us there is a view of some kind of ship. We go to the right and meet a drunkard near the ship. The fool almost falls into the water. We ask what's the matter.

He introduces himself as Captain Obo, behind him is the “Crystal” - his vessel. Kate decides to ask him where to look for the watchmaker Steiner, but the old man begins to talk about some kind of monster and nothing more. Well, we won't get anything from him. There is no point in going onto the ship for now; we won’t find anything interesting there. We go further and near the car we turn towards the tavern. It is located on the left side, we go there and talk to the bartender. We ask about Steiner. He advises to talk to his granddaughter, who works here as a waitress. Let's go and meet the girl. She says where to find her grandfather, adding that she herself will visit him later. We'll meet there. By the way, you can also spot Captain Obo here, probably a regular customer of this establishment. We leave the tavern and go further, turn left, then along the paved path we get to Steiner’s workshop.
During the conversation, the watchmaker notices Oscar's heart on Kate's neck. He recognizes the device and asks her where she got it. In the end, it turns out that Hans Voralberg lived here for some time and he and Steiner worked together. The old man suddenly feels unwell, his heart. He asks to bring him medicine. Hmm...which one? Okay, let's figure it out. We select a mug on the shelf with the clock. We examine the desk drawers. It's empty there. We go down to the basement. Below you can see a model of the "Crystal", perhaps Steiner designed it. We find Kurk's prosthesis on the table, but it is not finished yet. Nearby hangs a note, a reminder from my granddaughter: “Grandfather, don’t forget to take your medications three hours before dinner.” This looks like a clue.

So, three hours before dinner is probably five hours (5:00 p.m.). We go upstairs and approach the clock on the shelf on the right.
There were drops of tea left on the stand below. We put the mug in this place, open the glass of the dial on the watch and set it to 17:00. The mechanism works and the healing tea is prepared. We take the mug and give it to Steiner. The old man is grateful to Kate and says that as soon as the mechanical leg is ready, he will visit Kurk and lead him to the rest of the Yukols. He also says that he does not advise crossing the lake, since Baranur is further away. We follow Steiner down to continue the conversation. Having gone down, we immediately pick it up in the box. We insert it into the player and watch the picture. Baranur turns out to be a ghost town with nothing alive after the explosion of a nuclear power plant. Baranur and Valsembor border and are separated by water. Kate notices Oscar, the XZ-2000 robot, in the film, although there are many of them. They were created to help residents. Their mission was to save the people of Baranur from the radiation after the accident and transport them to Valsembor.
The conversation is interrupted by Sarah. We go upstairs with Steiner. He introduces Kate to his granddaughter, but we already know each other.
Steiner asks his granddaughter to help Kate figure out how to transport the Yukol tribe across the lake. But she already had an idea. Her plan is to use the Crystal ship. But the problem is that the captain swore not to go there again, talking about the lake monster. We will have to somehow convince the superstitious drunkard captain to go to Baranur.
We go to the tavern and talk to Sarah. Then we approach the captain at a table in the corner and start a conversation. He somehow sharply evades and begins to tell his stories. The conversation didn't go well. We approach the bartender and tell him that Obo is terribly drunk and there is no way to talk to him. The bartender says he'll make him a sobering cocktail, so his head should clear up. Sarah also does not advise criticizing him. We talk with them about the remaining topics and return to Obo. We must try to convince him the first time. For this, it was necessary to find out more information from the bartender and Sarah.
Let's start a conversation. You should immediately cheer him up by saying something flattering. Then say that the city needs him. The next two answers can be anything, after them it is better to play on his pride by intimidating that you will buy a ship from him. Ultimately the captain agrees. All that remains is to prepare the ship for departure.
Preparing to sail
We leave the tavern and now head to the ship. We go onto it and go up to the captain's bridge. We talk with the captain on all topics. He gives us a couple of tasks for the final preparations before setting sail. First you need to open the hatch to the coal bunker. Then go to the warehouse and replenish the supply of coal, we also receive from him the code to enter the hangar. And use a crane to load the coal into the bunker.
We go out onto the deck and open it near the exit from the ship. Press the button and rotate the wheel. Now we get off the ship and go opposite to. On the panel enter the access code ( 0509 ), received from Obo. There is a cart inside on the right; we move it forward almost to the very end. We immediately pull the lever to move the rails to the position we need. We go into a place fenced with a net. There we select a chute through which coal will be fed into the cart. There is a pipe nearby, but not in the cage. We take it and check all the compartments for sound output. If the sound is dull, then there is coal there (the penultimate compartment is in the right row). We approach the compartment that produces coal, interact with it and take it out of the inventory. Click on the button to start the process. When the filling is complete, we board the blue “locomotive”. We take out the knife from the inventory and on the panel. We attach it to the lower right part, where the button is also missing, and pull the lever forward. The coal has been mined, now all that remains is to load it onto the ship.

We go to the tap and enter the code. It is the same as from the door. We go up the descending stairs. In the cabin we see a dashboard with which we need to control the crane. The lever on the left is responsible for crane moving on the ground (1), buttons on the monitor - camera change for ease of use (2), the top button is used to lower the hook (3), the bottom button is used to tilt it (4), the lever has a circular stroke turns the crane tower(5), well, the rightmost lever is behind turning the crane around its axis(6). First, turn the crane tower to the left (5), press the top button (3) to grab the trolley, then turn the crane tower again by turning the lever to the upper position. Now pull the left lever (1) twice to the right to move the tap. Press the right button on the monitor once to switch the camera (2). We press the right lever (6), then pull the left lever to the right (1), turn the tap again and pull the left lever again. Switch the camera twice with the right button on the monitor (2) and press the bottom button (4) to pour out the coal.
The next step is to connect the water tower to the ferry. After this, you need to climb the tower and supply water. So, we go onto the deck, turn right and pull the hose, lowering it into the gutter. Then we lower the lever back to the left. Press the lever on the tower to fill the tank with water. We return to the captain with a report. We learn from him that we won’t sail far because the ship’s ignition key has disappeared. Moments later, he remembers that he threw it into the water when he swore that he would never return to the lake. Perhaps Steiner will have a duplicate key, he designed the ship, he must have a spare one. Let's go to him.


Steiner is not in his place; his granddaughter replaces him. We explain the whole situation to Sarah, after which we get a handle from her to examine the model. We go down to the basement. To the right of the layout there is a toggle switch that turns on the light. We select the handle in the inventory and insert it into the lock, rotate it until it opens. Another puzzle. On board the ship there is a disk with numbers. We read the attached sign near the layout. The text contains numbers...60...80...30... With each correct number entered, the anchor on board lowers. The sequence is as follows - 30, 80, 60, 100. Then we pull down the anchor. The roof on the captain's bridge will open. There will be a key inside. We press the button, turn it and take it out. Kate notices that it's a little small for the Crystal.

Opposite the layout is an installation. We approach it and take the key blank from the box below. Let's look at the car above. There are doors on its sides. Open the left one and install a miniature key there, press the button on the left to lock it. We close the door. We place the workpiece in the right door and close it. Using the handle, set the value to 200 and press the start button. We open the door and take away the brand new key to the Crystal. We return to the ship and insert the key into the ignition. Obo reports another problem that is preventing us from sailing away. Port locks. The captain advises asking permission from Mayor Bulyakin to open them.

We get off the ship and head to the tavern. After it we turn right and run along the path around the buildings to the square where some kind of protest is taking place. Residents demand that the Yukols be thrown out of the city. We go up the stairs and talk to the mayor. We inform you that you want to leave the city with the Yukols, after which we select the option “think about the elections.” He gives the go-ahead, but clarifies that the locks will have to be opened manually, plunging into the depths. The mayor gives us a drawing that will help us open the underwater mechanism.
Opening underwater castles
We return to the captain on the bridge. We talk about all topics, after which we will need to meet him at the edge of the dam to get equipment for the descent.

From the ship we go down and run left to the lighthouse. In the barn we find and. We take it in the corner. They need to be filled out. We approach a gas station. We place the cylinders and lower a metal hoop onto them. We inspect the cylinder. It says "180 bar". We set the same value with the arrow on the panel on the left. Press the green button. The air supply has started. We return to the cylinders and press two levers. Ready, the cylinders are full. Now we go into the locker room and put on a suit.


We dive under water. Let's go right. We select 3 gears, two of which are located near the bolt mechanism itself. We head right to the second shutter mechanism. Turn the valve and pull the lever. The first part of the gateway will open. We go inside and approach the sunken ship. We pick up the chain near it and return to the first bolt mechanism. We look at the drawing received from the mayor. It follows that the gears are arranged like this: large on the left, regular on the right and stepped at the bottom. We put on the chain, rotate the valve and then pull the lever. Let's watch the video. We go to the shaman Ayahuasca and say that the camp can be closed, because a way was found to transport ostriches across the lake. The Yukolov tribe breaks through the security post and ends up on the ship. Now all that remains is to bring Kurk to the Crystal.
Saving Kurk
At the exit from the ship, Kate meets Sarah, who says that the hospital is closed and there are soldiers at the entrance. It looks like Kurk and Steiner are in captivity. We are going to help them. To access the hospital we use a cable car with a funicular. We head to Steiner's shop and pass it further. There will be an open gate on the fence ahead. We go forward and inspect the cart. We take the wedges from under the wheels. Two will appear in your inventory. Don't forget to pick up the third wedge on the ground. We go up the stairs and head to the operator's booth. The door is closed. We look out the window, there is a control panel for the funicular. We have to get inside somehow. We approach the door and interact with it. There is a small gap under the door.

We proceed like this:
- We use a small wedge and squeeze it to the right.
- Then open the inventory and insert the second wedge next to the first small one. The door will rise.
- We take out the small wedge and insert it on the left side of the door.
- Take another wedge from inventory and insert it next to the small one on the left.
- Again we take out the small wedge and place it on the wedge on the right.
The door was removed from the curtains and fell. We go to the control panel and try to call the cable car. Nothing comes of it. No electricity. There is a shield hanging on the wall to the right. Insert the knife and open the lid. We lower the lever down. We return to the panel and pull the lever down. We leave the point and get into the carriage. We go up to the clinic. Doctor Efimova is already putting all her brains into the trigger.


We go out the gate to the hospital. There is a military helicopter nearby. We head to the entrance and get inside. On the way there are military men led by a colonel. It won't work to break through. We leave the hospital and head out to explore the helicopter. We go in from the other side and find ourselves in the cabin. At the end we find a walkie-talkie in the box. Let's go to the hospital again. We use it to distract the soldiers, pretending to be Doc Efimova. We go into the corridor behind the register. We are found by Doctor Zamyatin, who is caring for the wounded Steiner. They say that we need to help Kurk as soon as possible. We leave the office and walk along the corridor to Efimova’s office. Let's go inside.


There we will find Kurk in a chair. We examine the sheets of paper on the side of the chair. We take the paperclip from above. At the back of the chair we open the panel and see the mechanism. We use a paper clip on it. On the other side of the chair there is a needle for injecting a tranquilizer. Interact with the needle to pour out the contents of the syringe. Open the lid on top and pour in the shamanic potion. On the right we lower the needle to make an injection. Kurk comes to his senses. On the same side, we lower the lid down a little lower; a code panel is installed there. We look around the room looking for a combination. There is nothing like that here. On the doctor’s desk we find her figurine and a note from Dr. Mangeling. We take a closer look at the note in the inventory; the part with the code on the note is torn off. Damn it! All that remains is to try to use the figurine. We use it on the panel and Kate breaks the mechanism with a heavy thing. We watch the video of Kate and Kurk escaping from the hospital. Near the ship, Sarah asks about her grandfather and gives her scarf as a farewell gift. "Crystal" goes on a journey!

Fighting the Kraken
On board, Captain Obo battles his fear of meeting his monster by drinking alcohol. Suddenly, the ship bumps into something. Monster? No, just ice. The captain sends Kate to start the icebreaker in the engine room. We go down the stairs twice. Along the way, you can pick up yukol matches at the seats. Having picked it up, we go left and down the stairs again. Then right to the central panel.

First, turn the valve at the top right (1). We put the gearbox in first (2), then press the red button (3), then pull the lever to the lower position (4), quickly first third and then second gear.
"Crystal" overcomes the ice obstacle. But after a while something holds him back again. The captain asks to go check on this time. We go out to the stern of the ship and watch the video. The ship was attacked by a giant octopus. But the captain, it turns out, wasn’t lying. The captain says that the monster is attracted to light, we need to turn off the lights. On the starboard side near the lifeboat you can find. We use them to break all the spotlights around the perimeter, there are 4 of them in total. The monster prevents us from breaking the last one. We go into the passenger lounge and find it under the seat. Inside we take away the emergency flashlight. We go out to the monster and take out a lantern from the inventory, distracting it. Now you can break the last spotlight.

But the kraken doesn’t stop there and pulls the ship to the bottom. The captain gives the order to turn off the engine. We go down to the engine room and go to the place where the icebreaker was launched; a little to the right there will be a lever to turn off the engine. But this doesn't seem to work either. We return to the captain. You can find him in the boat on the starboard side. He came up with a plan to distract the monster. We need to get a lamp. We run into the engine room and turn left on the stairs; there will be a lamp on the table. However, it requires fuel. We go up to the captain's bridge, but do not go up the small stairs. Near the bookcase. We examine them; in one, it turns out, there is a bottle of strong vodka hidden. We pick it up and go down again to the engine room. We fill the lantern with fuel and light the yukols with matches. We return with a flashlight to the captain's boat and watch the video. The Kraken unsticks from the ship and Kate, along with the yukols, continues on her way.
Baranur
The ship encounters a strong storm. Kate wakes up on a ship that has run aground right next to the pier, the pier...Baranura? There's a lot of radiation here.
Radiation check
The first step is to measure radioactivity in the area. At the bow of the ship, opposite the searchlight, there is a device that measures background radiation. There is a lever to the left of the device, but you need a key to start it. We go up to the captain's bridge and take Crystal ignition key. We return to the device, turn the key and lower the lever. Open the lid below and take away the glasses. They allow you to see the radiation. Kate looks around, everything seems clean. We leave the ship to look around.
Restoring electricity
We go down to the beach and go down the screen. Kate notices the automaton. Suddenly she remembers what Professor Steiner told her. The XZ-2000 brought soul and mind together, so with Oscar's heart, it won't be hard for us to bring it back. We examine the automaton; there is a lid on the chest that opens with Voralberg’s special key. We don’t have this yet, so we’ll leave this matter for later. We go to the building on the left, climb the stairs and find it near the wall telescopic rod.


We return to the ship. At the pier, we remove the wires on the pole using the rod we selected earlier. Then we talk to Burut. Kate asks him to connect the cable to the Crystal.
Baranura Park
We go down the board and go to the stairs. We go through the gate. We go to the building on the left. Can be found in the trash inside gear And chest, which is marked with the Voralberg sign. Also hanging on the wall is a map of the park marked with Roman numerals. We go out through the other door to the other side of the bridge. We go down the screen, we will find ourselves at the broken part of the pier. There is an automaton sitting in the locomotive, we take the key from him. Kate notices that it is possible to tow the ship using a tractor, but there must be an automaton sitting there, which is connected to a contact. We return to the building and open the chest on the table with this key.

We take it from it Voralberg key And wrench. We leave the building and meet Yukolov at the threshold. After talking with them, we go left deep into the park and find near a wooden bench metal rod. We leave the park through the gate leading to the beach. We approach the bench on which the automaton is sitting and use Voralberg's key to open the lid on his chest. Turn the key to the right, cling to the cover and also turn it to the right. We take out the old heart and insert Oscar's heart. We open the covers on the heart valves and insert the “artery contacts” there. We unscrew the bolt with a wrench and see the activation lock. We don't have a key for it, so we'll leave it at that for now. Wait, Oscar, we'll be back!


We go up the stairs and enter the park. Upon entering, Kate hears the sound of a cart approaching. In the park we again go up the stairs on the right and we will get to the car that drove up recently. We pick up a clue on the ground. We get into the carriage. On the seat on the right we immediately select the second one metal rod. Zooming in on the dashboard. On the left there is a lever for changing the marks on the dial (1), on the dial (2) there is a scale up to the “50” mark and many holes on it. On the right is the machine launch mechanism (3). This is where the map with Roman numerals that we saw on the wall earlier comes in handy. First, you need to unscrew the value to “50” (you can’t go lower), then insert a metal rod into the right place and press the machine’s start lever. She will stop where the metal rod allows her to reach. The map had the designations "15+25". Use the lever to set the value to “50”, then insert the rods into the hole near “25” and “15”. Let's start the machine. It will stop at “25”, remove the rod from this value and the next stop will be point “15”. This is exactly what we need. We leave the transport and go down the stairs.

Now that Oscar is ready to work, we return to the tractor, which will tow the Crystal. All that remains is to conduct electricity from the ship to the tractor. We go to the "Crystal" and go down to the engine room; next to the control of the ice ax device you can find the power switch. Near the ship we tell the Yukols to tie the tractor to the Kristall. We return to Oscar and ask him to start towing. Also, if you have not removed the fallen cars from the tracks, then you should do so. Nothing comes of it, the ship only buries itself further into the ground. Oscar asks to loosen the cable in order to move the tractor further along the pier. We inspect the rear of the tractor. You won't be able to turn the lever manually. We use a wrench, then the lever will give way. We tell Oscar to move the carriage. We approach Yukoly near the tractor and ask him to tie the cable to the Ferris wheel. We climb onto the wheel and insert the gear into the mechanism on the right, if you have not done this before. Now we launch the wheel on the button on the panel on the left. We watch the cut-scene, after which we get out to the beach to Yukoly. All that remains is to release the ostriches from the ship outside. We run to the stern of the ship and press the button. And the shaman seems to have a crush on Oscar...

We watch the cut-scene. The colonel and the thugs follow close behind.
“Historical Center” metro station
Kate and the rest of the expedition end up on the subway. Unfortunately, the path is blocked by bats. Let's find a way to get rid of annoying creatures.

We try to get to the mice, but Kate just runs away from there. We raise our heads up and see the ventilation, where bats are stored. We go up the stairs to the left of the tracks and talk to Oscar. We ask him how to drive away the bats. He gives a clue that they fear anything that harms their "physical integrity." Remember. We go down the stairs to the right of the tracks and go along the corridor to the left. We go down another staircase and on the left we find seaweed, they will be needed later. We go near the canal to the right and meet Yukol, who will give us stick. We go out on the path, and on the right we see a workbench at which you can do something. We select on the table lighter And bottle. We insert the stick into the hole on the table. It looks like you can build a torch and drive away the mice. We go to the ostriches on the right and pick them up. We return to the workbench and wrap the stick with a rag. We use the bottle on it and then set it on fire. We try to drive away the bats with fire. This doesn't work, they try to escape through the ventilation, but it is closed with bars. We need to somehow open the hatch from the outside.
We go to Oscar, because he is a machine and he is not afraid of radiation. He agrees to help and goes into the radioactive zone. Now we will manage Oscar. We go up the stairs and go to the surface. We head along the building of the historical center and find a red fire truck.


We inspect the ignition switch. There is no key. Open the glove compartment on the right and find key. We start the car and pull the lever behind the steering wheel. The car drives closer to the building. We climb onto the back of the body and take control of the boom. The upper left lever is responsible for turning the turret, the lower one for lifting, and the last one on the right for extending the boom forward. We go up the stairs and inspect the hatch. You can't just open it, the edges are welded.

We leave the car and go forward until we find the bank building on the right. We select plumber's scissors on the floor. We return to the car and use them on the grill. Ready! ...but there's one problem. The sound of a falling grate attracted the mechanical dogs. We get off the boom and inspect the fire hydrant. Remove the plug from the hole and take out the pin for the hose reel. Let's inspect the coil. Pull out the hose and connect it to the hydrant. Then we inspect the hydrant and turn the valve. The last step is to start the water pressure and wash off the mechanical dogs. We return to the metro. Oscar has received a dose of radiation, so the decontamination procedure is started. But it is interrupted because... not enough iodine to continue. However, Kate has seaweed that is rich in iodine. We insert the algae from the inventory into the receiver and complete the cleansing procedure.
All that remains is to scare away the bats. We approach the workbench where the torch was created and take the lighter. We watch the cut-scene. Kate and the Yukols leave the metro and stop for a rest.
Temple of the Red Moon
We find Kurk and the shaman Ayahuasca near the fire and talk to them about all topics. The Yukolov Temple is hidden somewhere nearby and must be found.

We leave the camp and go to the open gate on the right. We go up the escalator and head left. We follow the corridor and go down the first staircase at the end. On the site we find yukol tools, we cannot take them. We go down even lower and run along the corridor to the gate, go into it. We go forward and find a village. We go into the house. After the conversation, Dunyasha Dubrovskaya gives the notebook and asks to give it to the conductor, i.e. Kurku. We leave her house and go into the cave on the left. Taking it from the wall green lens yukolov (01). We return to Kurk and give the diary so that he can translate it. To quickly get to it, there are others near the gate that we used to get here; we exit through them.


After he translates the diary, we leave the camp and go left. Continue straight along the path until you turn left. In the distance you will see a building with a large door. We follow there and go inside. This is a swimming pool. We climb onto the large springboard and inspect the three depressions at the end of the side. We go down from the springboard and look for a ladder to the bottom of the pool. We examine the stones on the wall.
Now we return to the camp and open diary, which Kurk translated for us. We must put lenses in place of those holes on the pool diving board. We already have one, it was picked up in a cave near the home of Dunyasha Dubrovskaya. is located in the corridor (where we went up the escalator and went left). In the middle of the corridor there is a door leading to the hall of fame. Immediately to the right behind the glass door there will be a lens. We take out the scarf in our inventory and use it on the door so that Kate doesn’t hurt her hand when she breaks the glass. the lens is located where we saw the Yukol tools on the landing. We go further along the corridor and go down the first staircase. We interact with the chair, open the panel under it and find a lock with symbols. A hint on how to solve this puzzle is in the diary that Kurk translated. Enter the characters as in the screenshot below.

All lenses are collected. We go back into the pool and install the lenses on the diving board in the order (from left to right): blue, green, red. Now we begin to direct the mirrors. Below is how the mirrors should be positioned.

A passage in the wall opened. We go down to the pool and go inside the temple. We watch a cut-scene about Kate's past.
Sacred Bridge
Kate wakes up in the yurt. The screams of the Yukols can be heard outside. After she is on the ground, we return to the yurt and take our things from the box - knife And flint.
After that, we leave and head to the bridge. Kate needs to be found. He stands on the edge of the cliff, which is to the right of the building. On the way to it you can see a stove with four pipes. We talk with Kurk on all topics. We learn that the old sacred bridge was destroyed. And the one next to it is customs. To cross, the Yukols must obtain permission from the Guardian on the other side, but since the bridge was destroyed, they will not be able to cross. Kate volunteers to cross the river on the new bridge and talk to the guardian.


We head to the customs post and talk with the customs officer. At the end of the conversation, he says that it is necessary to connect the water wheel on the river to cross to the other side. We go behind the building and go down the metal stairs to the very bottom. We go to the lever and pull it. After this, one part of the bridge will rise. We return to the bridge, the customs officer will let us through to the other side. We turn right and enter the Guardian's tent. We talk with him and understand that we need to bring vodka as gifts to the spirits. But they will absorb it through the Guardian, cunningly! In addition to gifts, you need to read a prayer to the spirits. They understand only the language of fire and smoke. Maybe a stove on the other side of the river will help? Having finished the conversation, we cross back across the bridge. The customs officer will get scared of something and ride away on his motorcycle.
We approach the place where the motorcycle was and pick it up nearby. We go around the back of the customs post and use the brick on the locked door to break the glass and get inside. On the table near the window we select in the basket flask with vodka. We go further and pick it up on the table in the room.
We leave the point and go down the stairs one level below. We pass through the opening and find ourselves in a room with stone walls. We find a red button on the wall. We press, thereby calling the trolley from the other side. We put the flask with vodka inside and press the button again to send the Guard to the other side. After a while, the Guardian will send in return sawdust, we take away the bag of sawdust.
We go upstairs and go to the ostriches. We find it near one of Oscar's yurts. We climb inside and talk with the shaman Ayahuasca. According to the shaman, prayer means sending smoke signals using ancestral machines. We are in no hurry to leave the yurt. We take it out of the chest next to Ayahuasca rod.
We head to the place where we talked with Kurk and find that very stove. We inspect the car. Inside we will find several items - red, blue, two yellow resin quarters, and also full blue resin circle. Some funnels And log. Three of the four funnels will be located behind the left oven door, and the last one, the fourth, will be in one of the pipes at the back of the oven.

We leave the furnace inspection screen and approach the stump nearby. Place a circle of blue resin on it and use a knife to cut off just a portion. Will appear in inventory quarter blue resin.
When all the items are collected, you can start lighting the stove. To do this, you need to turn on all the valves correctly and place the objects in the right place:
- We place the Ayahuasca wand in the middle of the stove - this is a hint that tells what color and shape the smoke coming out of the funnels should be. The funnels determine the shape, and the color of the resin, of course, is, as is not difficult to understand, the color of the smoke.
- Rotate the screen so that you can see the back of the stove. We open the valves on each of the chimneys. We must place the funnels in the chimneys in a certain order. Each funnel is numbered, we arrange them from “1” to “4” from right to left.
- Open the drawers and pour sawdust into them
- Close the vent at the bottom left of the stove by turning the valve to the vertical position
- We open the large doors from below and place a log in the middle, lay paper under it and light the whole thing with a flint.
- We place the resin in the chimneys: from the hint on the wand it is clear that you need to put a red piece of resin in the left chimney, a blue piece in the two central ones, and a yellow one in the right one. Inside each chimney there is a stand with holes on which you need to put the resin.
- Each stand has handles that can be used to lift them up. Below them there are also stands with a quarter cut out. We place the pieces of resin on the upper stand so that there is a cut out sector under them on the lower stand. As in the screenshot below. The lower stands can be rotated.

- There are valves under the stands, they are set to a horizontal position, turn all the valves to a vertical position

When everything is done in the specified sequence, the oven will release a colored smoke signal and the transition will be possible. We watch a long cut-scene that concludes the third part of the series.
The first part of this game was released back in 2002, and it was an unambiguous success. She set a new bar for the genre, which at that time was stagnant. An interesting quest about a young lawyer who, by the will of fate, finds herself drawn into a journey to a mythical island on which living mammoths are preserved, was liked by many. The continuation of the project did not take long to arrive; 2 years later a sequel was released, which turned out to be somewhat worse than the original. And now, after thirteen long years, the third part comes out. In Siberia 3 review of the game, we immediately note that part of the series turned out to be quite ambiguous.
Plot
Let's start the review of Siberia 3 with the plot. The history of the third part of the game cannot be considered in isolation from the previous two, since it is a direct continuation of them. Therefore, let's remember what happened in the game universe before the events of Syberia 3. The main character named Kate Walker comes from New York to a fictional (like everything else in the game world) town in the Alps for work. She is an employee of a law firm who has arrived to formalize a purchase and sale agreement for a local enterprise producing mechanical toys. A seemingly ordinary transaction turns out to be the beginning of a large-scale, long-distance and fateful journey. Together with the intelligent, human-like "automaton" Oscar, Kate goes in search of the real owner of the factory - Hans Voralberg. This eccentric and brilliant hereditary inventor devoted his life to one great cause - the search for the legendary northern island of Siberia. On the way to Hans, Kate finds herself involved in various adventures in pseudo-German and later in pseudo-Russian lands, also visiting other interesting places. Let’s not spoil too much, in the Siberia 3 review we’ll just say that in the end Kate met both Voralberg and those same mammoths.
The third part begins with the main character left alone in the middle of the tundra. She is saved from death by the Yukol nomads - a tribe of short people with a heavy build. The Aborigines were just carrying out a ritual migration harnessed by snow ostriches (huge fictional animals designed to partially replace mammoths). Kate regains consciousness in one of the hospital beds in the town of Valsembor. She is immediately faced with the need to unravel a large tangle of problems, the main one of which is certain villains who, for some reason, decided at any cost to prevent the Yukols from coming to the right place. The unscrupulous activities of the one-eyed army colonel and the even more disgusting doctor Olga are also aimed at Kate. Naturally, the main character without hesitation begins to help her new friends who saved her life.
Gameplay
Let's continue the Siberia 3 review with gameplay analysis. The game has a good plot and atmosphere, but the gameplay is not so successful. Firstly, the point-and-click system, which was present in previous parts of the series, disappeared, and which was later added to the game with an update. Secondly, the project chose a not very good goal - to appeal in every possible way to newcomers who are not familiar with the previous parts, which is expressed in a bunch of little things to simplify the gameplay and orientation on the console. Thirdly, there are shortcomings and bugs, of which there are a fair amount in the game. With the update, there are fewer of them, but crooked animation cannot be cured by any patches.
It should be noted in the review of Siberia 3 that during the game the character of the main character is not revealed in any way, which confirms the version that the chief developer of Syberia 3, Benoit Sokal, made the game mainly for non-fans of the original. This includes the addition of fashionable variability in dialogue (with a completely linear plot) and the ability of the main character to talk with many NPCs.
The in-game world has become a little livelier, it should be noted in the review of Siberia 3, the characters for the most part depict vigorous activity, walking around the neighborhood and pestering others who are equally active. This affected the greater dynamism of the narrative. In general, the third part became more cheerful to play than the previous two. 
As for quests, in the review of Siberia 3 it should be mentioned that Sokal tried to make the puzzles more friendly, since the previous parts were difficult to complete due to a lot of non-obvious decisions by the developers. And he partially succeeded, to the delight of not only newcomers, but also old fans. But the game still has its share of difficult tasks that can discourage a fair number of players.
Result Siberia 3 reviews
Despite the technical flaws revealed in the review of Siberia 3, we came to the conclusion that the game is quite passable, although plot-wise and conceptually it does not reach the level of a duology. Those who are ready to forgive a lot just for the sake of another meeting with Kate Walker and the bizarre gaming universe will certainly enjoy the game. Benoit Sokal ultimately did a good job: he preserved the atmosphere of the original, gave us an interesting story and complemented it all with wonderful music from Inon Zur. Siberia 3 review is over.
Walkthrough and saves for localizedSTEAM-game versions
from the company "Buka"
Gameplay Features
The character is controlled using the cursor keys (arrow keys) or the keys WASD. Rotation of the viewing camera is ensured by moving the mouse to the edges of the screen. After the update was released, it became possible to control the character using a computer mouse.
We also interact with objects using a computer mouse.
Types of cursor(the icons below will be placed inside the circular cursor):
- Gear- action with an object
- Magnifier- close-up inspection of an object
- Open palm– take an item
- Disconnected bushing– mechanical interaction with an object (pull, push, rotate, etc.)
- Eye- inspection of the item
- Mouth– Kate's comment
- Sound waves- communication with another character
- Camcorder– panoramic inspection of the area
- Arrow- move, open
When Kate dialogues with other characters, a choice of phrases is offered. If they are important for completing the game, then this will be said additionally, so in other cases the player is invited to build a conversation on his own. A short time is given to select a replica. If you did not have time to select anything, the “keep silent” command is automatically executed.
To make Kate look in a certain direction, you need to move the mouse pointer to the edge of the screen. The mouse is also used to examine objects from different angles: without pressing the mouse keys, you need to move the mouse in different directions.

Inventory called by key I or by clicking on the wheel of a computer mouse. The inventory appears on the left screen. In the inventory, items are located in round slots. You can only use the item that is in the central slot. To scroll through items in the inventory, use the mouse wheel or the cursor keys (with arrows).
To call the game menu and pause the game, use the key Esc. From the game menu you can exit to the Main Menu. In the “Settings Menu” you can individually disable all system messages: tasks, training, notifications in dialogues.

The game is saved automatically when you exit the game or at checkpoints. After returning to the game, you can press the “Continue” or “Load” button. You can only download those files that the game saved at checkpoints provided by the developers.
Note. There are several bugs in the game where when you click on the “Continue” button, an endless loading screen appears. Such moments that I noticed will be discussed in the text of the walkthrough.
There is only one save file, so you won’t be able to go back to replay the desired moment. You can create a separate folder in which it is best to save progress in separate parts. You can remove your last save into the same folder, and insert the downloaded and unzipped save into the place of the removed save. It is not always possible to make a save immediately after completing a task, so sometimes you will have to skip videos or dialogues between characters. The save is located in a hidden subfolder at : C:\Users\UserName\AppData\LocalLow\Microids\Syberia3\Options
Warning. Be careful. After downloading and using the save, you will have your own version of the game and all your achievements will be lost.
The game was played in the “Journey” mode.
Note. To enlarge the screenshot, click on it in the text of the walkthrough. To view additional screenshots, click on the active links highlighted in the text of the walkthrough in dark red.
Clinic of Dr. Zamyatin
hospital ward
After the introductory video, we come to our senses in the hospital room. We hear someone calling our name. We say hello and approach the person in the medical chair. We meet Kurk, the spiritual leader of the Yukol tribe. We talk through all the proposed topics with him, selecting them by clicking on the selected phrase. We pay attention to Kurk's crippled leg. We wonder why Kurk is tied up and what happened to his leg.
Kurk is not only the leader of the Yukol tribe, but he is also the guide of a caravan of snow ostriches that go to the Sacred Lands to breed. This happens only a few times in a hundred years.
We finish the conversation and decide that we need to find medical personnel to report our recovery.


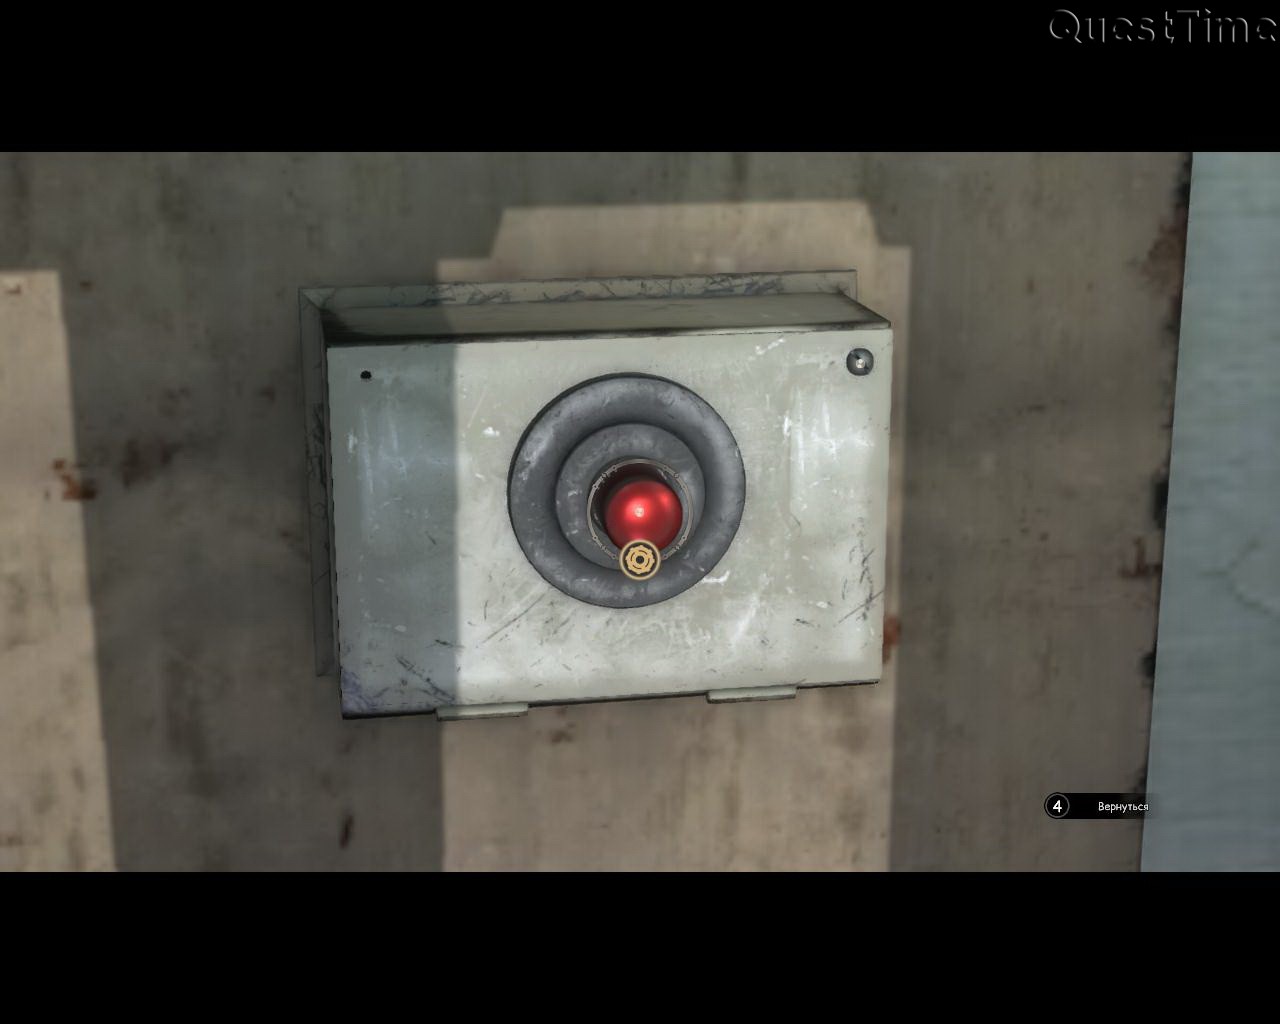
We approach the door on the left and move the cursor over it, in which a gear icon appears, which means “action”. Press the left mouse button (LMB) and pull the handle. The door is locked. Move the mouse cursor to the right and point it at the red button to the right of the door so that a gear icon also appears on the button. We click on it and find that the button does not work.


We move the mouse cursor to the right so that the box with the red button unfolds and we can see its side. Now a magnifying glass icon appears in the cursor. This means that the object can be viewed up close. Press LMB and look at the instructions for repairing the button mechanism. But in order to begin repairs, we need to somehow open the box with the bell mechanism. The diagram shows that to open the box we need to unscrew the screw at the top right.
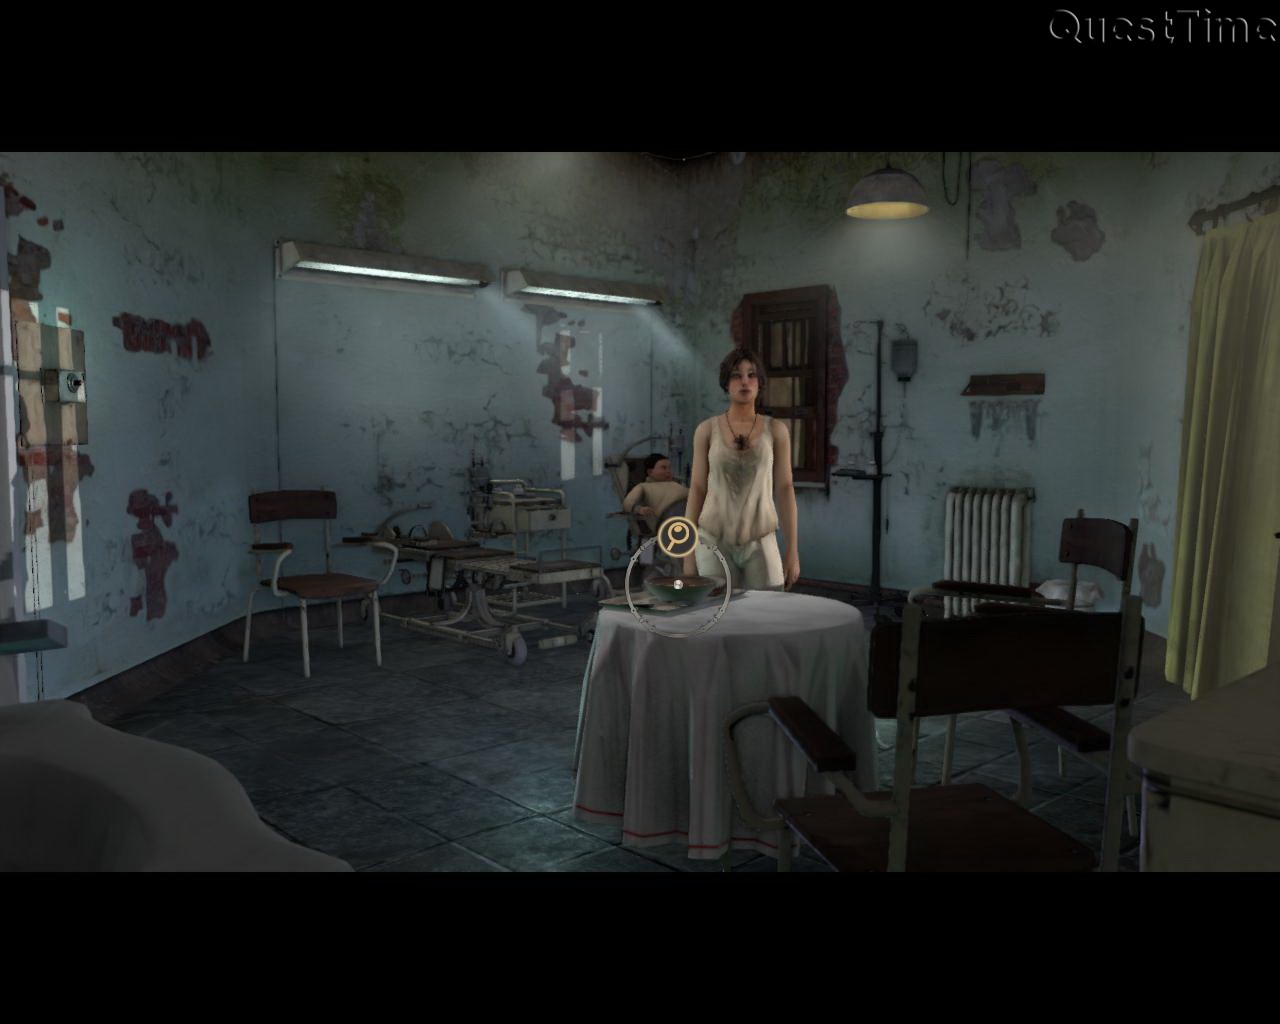


We leave the approach and look around. We approach the dining table, click on the magnifying glass icon to take a closer look at the table. On the table we see a table knife, which can be used instead of a screwdriver. Click on the knife, on which icons of an eye (examine the object) and a hand (take the object) appear. Click LMB on the hand icon and the knife is placed in our inventory.


We return to the door, hover the cursor over the box with the button and press LMB. Call up the inventory by pressing a key I or right mouse button (RMB). Using the mouse wheel or cursor keys (arrow keys on the right side of the keyboard), move the knife to the central compartment (circle). Then LMB click on the screw in the upper right corner of the box, and the knife automatically appears in the screw slot. Click LMB on the “use” button. After the gear icon (interact) appears, hold down the left mouse button and, without releasing it, begin to make circular movements with the mouse counterclockwise to unscrew the screw. Once the screw is removed, Kate will automatically open the box lid.


Inside we find a rechargeable battery with a disconnected green wire. We saw in the diagram that both wires must be connected to the power supply inside. Move the cursor to the free end of the green wire, press LMB and insert the wire into the socket at the top right. A green light on the power supply lights up, indicating that the mechanism is in working condition. Now we need to put the battery in its place. A gear icon appears on the top of the battery. We press LMB on it, and the upper part is recessed into the lower container.
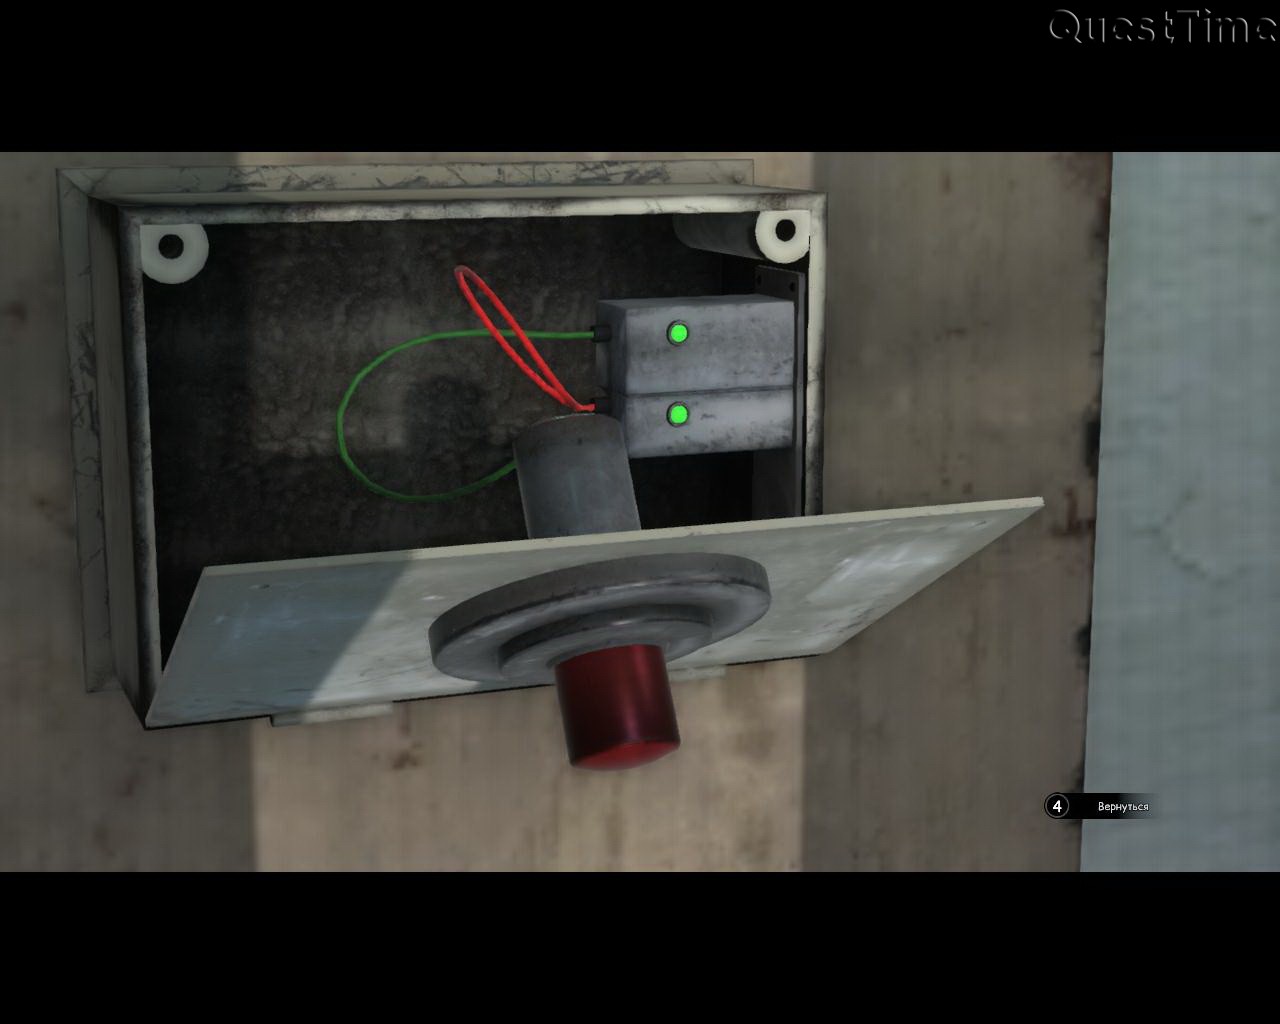

We pull the cursor up and Kate automatically closes the bell mechanism box. Click on the red button to open the door from the room. Kurk reports that he will rest while we look for medical authorities.
hospital hall

We go out into the hospital corridor and look around. Please note that a task appears in the upper right corner of the screen: find a doctor. Let's go to the left screen. Along the way we pay attention to mechanical birds in a cage behind blue bars. We pass by two patients and we involuntarily stop to listen to their conversation. We hear a complaint about severe headaches that began after Dr. Olga began treating him. To the left of the door to the office there is a rest room. We enter it and communicate with two chess players who have been patients of the clinic for twenty years.


We leave the rest room and stop in front of the door with a sign. We read “Doctor Mongeling” on the sign and understand that we have come to our destination.
Doctor Mongeling's office
We open the office door and enter. The doctor looks up from his papers and approaches us. He greets us as "number 10". We tell him that we have a name and ask him to contact us by name, not by number. The doctor perceives our statement as a manifestation of an act of aggression. We inform you that we want to leave the hospital, but the doctor has his own opinion on this matter. Almost forcibly, he sits us in a medical chair and offers to take a test to determine our adequacy.

You can answer the testing questions at your own discretion, because... As a result, we still receive a strange key from the doctor.


We say that we want to pick up our things before leaving. The Doctor points to a black chest of drawers in the corner of the room and we head behind the counter. We approach the chest of drawers and point the cursor at the second drawer. Hold down the LMB and pull the drawer towards you to pull it out (point the cursor down). We touch our things and ask the doctor to turn away. We click on a stack of our things that look clean and ironed.
Kate automatically changes clothes. A new task “Leave the floor using the key” appears on the screen.